Redis is a popular in-memory data store used for many use cases. However, by default, it is not configured to be highly available (HA) or distributed. Redis Sentinel provides high availability for Redis. It is designed to run in distributed environments where multiple Sentinel processes cooperate with one another. Redis Sentinel also offers features such as monitoring and notifications for administrators.
Another option for achieving high availability is Redis Cluster, but there are some key differences between the two. Redis Cluster provides features that Sentinel does not, such as automated sharding and support for horizontal scaling. Nonetheless, both Redis Sentinel and Redis Cluster can be used to achieve high availability for Redis.
In this article, we will focus on the set up and implementation of Redis Sentinel in a Kubernetes environment. We will also take a look on how it handles failover and deals with split brain condition. The official documentation covers the topic in depth as well as provides practical examples, but here we will walk through a minimal working setup on Kubernetes and get to know how to setup Redis in HA mode with Redis Cluster.
Setting Up
We can manually setup Redis on Kubernetes, but the Bitnami Redis Helm chart comes in handy. To get started, first add the Bitnami Helm repository and update it:
helm repo add bitnami https://charts.bitnami.com/bitnami
helm repo update
This will make the Bitnami charts available locally so we can install Redis using Helm. I use this values.yaml file to configure a Redis deployment with replication and Sentinel enabled:
architecture: replication

master:
  persistence:
    size: 1Gi
  extraFlags:
    - '--enable-debug-command'
    - 'yes'

replica:
  replicaCount: 3
  persistence:
    size: 1Gi
  extraFlags:
    - '--enable-debug-command'
    - 'yes'

sentinel:
  enabled: true
  quorum: 2

auth:
  enabled: false
There are many other options that can be configured. However, this very minimal setup is sufficient for running Redis Sentinel with 3 replicas and a quorum of 2. The quorum refers to the number of Sentinel nodes that must agree on a decision for it to be considered valid. It defines how many Sentinel instances must agree that the master is unreachable before it is considered to have failed. However, this quorum only applies to detecting the failure. To actually carry out a failover, a leader Sentinel must be elected, and that requires a majority vote from all Sentinel instances.
For instance, if we have 3 Sentinel processes and the quorum for a master is set to 2:
- If two Sentinels simultaneously detect that the master is unreachable, one of them will try to initiate a failover
- However, the failover will only proceed if a majority of the Sentinels are reachable. In this case, at least 2 out of 3 are reachable and vote to authorize the failover
Unlike in Kubernetes, the minimum Redis Sentinel quorum is not strictly determined by the typical (n/2) + 1 formula.

The above setup exactly matches the "Example 2: basic setup with three boxes" in the official documentation. To deploy it, run the following command:
helm install redis-sentinel bitnami/redis -n redis-sentinel-demo --create-namespace -f values.yamlThe command also creates a new namespace called redis-sentinel-demo to isolate the Redis Sentinel deployment.
Once the deployment is complete, we can check the status of the pods:
kubectl get pods -n redis-sentinel-demoThis should show the pods running:
NAME                    READY   STATUS    RESTARTS   AGE
redis-sentinel-node-0   2/2     Running   0          9m23s
redis-sentinel-node-1   2/2     Running   0          3m4s
redis-sentinel-node-2   2/2     Running   0          2m39s
Verifying the Sentinel Setup
Once the pods are running, we can start verifying that Redis Sentinel works correctly and the setup behaves as expected. There are some commands that we can use to do that. Suppose that we want to connect to one of the Sentinel nodes, we can use the following command:
kubectl exec -it redis-sentinel-node-0 -n redis-sentinel-demo -- redis-cli -p 26379By default Sentinel runs using TCP port 26379, while the normal Redis port uses 6379. Once connected, we can run the following command to check the status of the Sentinel nodes:
> SENTINEL masters
1) "name"
2) "mymaster"
3) "ip"
4) "redis-sentinel-node-0.redis-sentinel-headless.redis-sentinel-demo.svc.cluster.local"
5) "port"
6) "6379"
7) "runid"
8) "b5a55c0a6eb3d870015175a7ed168714d3891f9f"
9) "flags"
10) "master"
11) "link-pending-commands"
12) "0"
13) "link-refcount"
14) "1"
15) "last-ping-sent"
16) "0"
17) "last-ok-ping-reply"
18) "225"
19) "last-ping-reply"
20) "225"
21) "down-after-milliseconds"
22) "60000"
23) "info-refresh"
24) "2899"
25) "role-reported"
26) "master"
27) "role-reported-time"
28) "1419592"
29) "config-epoch"
30) "0"
31) "num-slaves"
32) "2"
33) "num-other-sentinels"
34) "2"
35) "quorum"
36) "2"
37) "failover-timeout"
38) "180000"
39) "parallel-syncs"
40) "1"
There is a lot of information from this command, but we can get some useful insights from it:
- The
namefield indicates the name of the master being monitored, which ismymasterin this case - The
ipandportfields show the address of the Redis master node - The
num-slavesfield indicates how many replicas are currently connected to the master, which is2in this case - The
num-other-sentinelsfield shows how many other Sentinel nodes are monitoring the same master, which is also2in this case
To check the replicas, we can run the following command:
SENTINEL replicas mymasterIt will return a list of replicas for the monitored masters with similar information as above.
From the previous output, we can also see that the current master is redis-sentinel-node-0. Another way to check the master is to run the following command:
> SENTINEL get-master-addr-by-name mymaster
1) "redis-sentinel-node-0.redis-sentinel-headless.redis-sentinel-demo.svc.cluster.local"
2) "6379"
Interacting with Redis
After verifying that the Sentinel setup is working, we can interact with the Redis instances. By default, Redis Sentinel is configured to eventually consistent, so every partition will converge to the higher configuration available. We will see this in action later, but first, let's connect to the Redis master node to perform some operations.
To connect to the Redis master node, we can use the following command:
kubectl exec -it redis-sentinel-node-0 -n redis-sentinel-demo -- redis-cliIf we didn't specify the port, it will connect to the default Redis port 6379.
Try writing a random key. I found this command useful for testing:
EVAL "local k='key:'..math.random(); redis.call('SET', k, 'value'); return k" 0Running the command five times will create five random keys in the Redis master node:
> KEYS *
1) "key:0.35333609737146"
2) "key:0.39646477363839"
3) "key:0.44658343468168"
4) "key:0.31869277233197"
5) "key:0.84048536971234"
Now, let's check the replicas to see if they have the same keys. We can connect to one of the replicas using the following command:
kubectl exec -it redis-sentinel-node-2 -n redis-sentinel-demo -- redis-cliOnce connected, we can run the same command to check the keys:
> KEYS *
1) "key:0.35333609737146"
2) "key:0.39646477363839"
3) "key:0.44658343468168"
4) "key:0.31869277233197"
5) "key:0.84048536971234"
In every Sentinel setup, Redis uses asynchronous replication. The master node processes write commands and replica nodes receive updates after the master has processed them. As such, there is no guarantee that replicas have received or applied the latest writes at any given time. There are pros and cons to this compared to synchronous replication, but we will not go into details here.
Also note that we cannot write to the replicas, as they are read-only by default. Doing so will result in an error:
> SET 0 1
(error) READONLY You can't write against a read only replica.
Simulating a Failover
Redis Sentinel is designed to detect failures and promote replicas automatically. To test this behavior, we can simulate a failure on the master. There are many ways to do this, but one of the simplest methods is to pause the master node temporarily as written in the official documentation:
kubectl exec -it redis-sentinel-node-0 -n redis-sentinel-demo -- redis-cli
DEBUG sleep 60
While the master is sleeping, Sentinels will detect it as unreachable. We can observe the logs to watch the failover process unfold:
kubectl logs -f redis-sentinel-node-1 -n redis-sentinel-demo -c sentinel
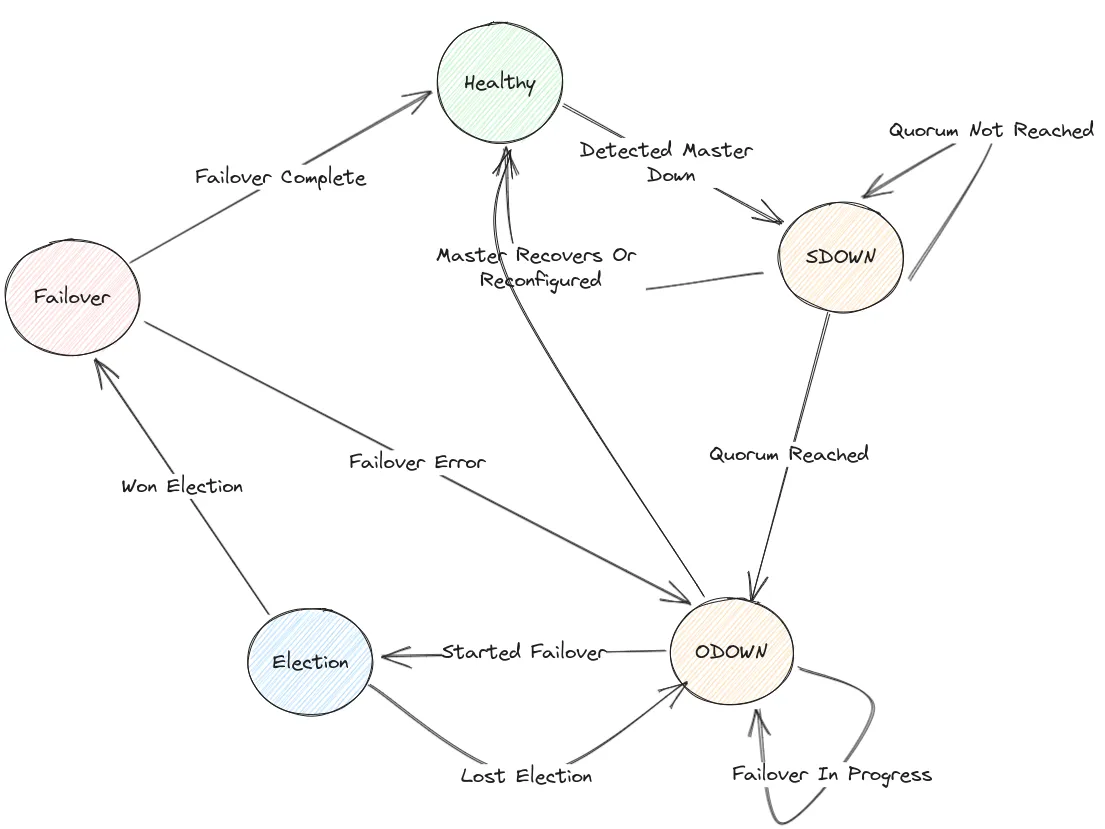
kubectl logs -f redis-sentinel-node-2 -n redis-sentinel-demo -c sentinelEach Sentinel begins the failover process by detecting that the master is down, which is marked by a +sdown (subjectively down) event.
This means that the Sentinel itself believes the master is unreachable.
If multiple Sentinels independently report the same issue and reach a quorum, the event is escalated to +odown (objectively down),
indicating a consensus that the master is truly unavailable.
At this point, the Sentinels hold a vote to elect one among them to coordinate the failover.
The elected leader then initiates the failover process, promoting a replica to become the new master and reconfiguring the remaining replicas to follow the new master.
The Sentinel option down-after-milliseconds defines the time in milliseconds that an instance should not be unreachable before a Sentinel considers it to be down.
In our setup, it is set to 60 seconds, meaning the master will be considered down if it fails to respond within that duration.
Note that this setting is configured independently on each Sentinel node.
After a short while, we can re-run the command to check which instance is now acting as master:
> kubectl exec -it redis-sentinel-node-0 -n redis-sentinel-demo -- redis-cli -p 26379
> SENTINEL get-master-addr-by-name mymaster
1) "redis-sentinel-node-2.redis-sentinel-headless.redis-sentinel-demo.svc.cluster.local"
2) "6379"
We can confirm that redis-sentinel-node-2 has now become the new master.
Split Brain Conditions
As stated in the official documentation, Redis Sentinel configurations are eventually consistent, so every partition will converge to the higher configuration available.
When certain conditions are met, such as network partitions or failures, it is possible for multiple nodes to believe that they are the master, a condition commonly known as split brain.
Consider our setup: initially, redis-sentinel-node-0 is the master, and redis-sentinel-node-1 and redis-sentinel-node-2 are replicas.
Suppose that we have a network partition that isolates node 0 from the other two nodes.
In this case, node 0 will continue to operate as the master, while node 1 and node 2 will still be able to communicate with each other.
However, since they cannot reach node 0, they will consider it to be down after the down-after-milliseconds timeout.
After some time, node 1 and node 2 will elect a new master among themselves.

This leads to a situation where both node 0 and the new master (either node 1 or node 2) believe they are the master. If there are writes happening on both nodes, this can lead to data inconsistencies, as each master may have different data. When the partition rejoins, there is some conflict resolution that will resolve the conflicting data.
There are several ways to simulate network partitions in our Kubernetes setup, such as using iptables to block traffic between pods or using Kubernetes Network Policies.
I will use iptables to block traffic between the nodes:
iptables -I FORWARD -s 10.42.0.8 -d 10.42.0.14 -j DROP
iptables -I FORWARD -s 10.42.0.14 -d 10.42.0.8 -j DROP
iptables -I FORWARD -s 10.42.0.12 -d 10.42.0.14 -j DROP
iptables -I FORWARD -s 10.42.0.14 -d 10.42.0.12 -j DROP
Now, after the down-after-milliseconds timeout has passed, we can check the status of the Sentinels again:
> kubectl exec -it redis-sentinel-node-0 -n redis-sentinel-demo -- redis-cli -p 26379 SENTINEL get-master-addr-by-name mymaster

Defaulted container "redis" out of: redis, sentinel
1) "redis-sentinel-node-0.redis-sentinel-headless.redis-sentinel-demo.svc.cluster.local"
2) "6379"

> kubectl exec -it redis-sentinel-node-1 -n redis-sentinel-demo -- redis-cli -p 26379 SENTINEL get-master-addr-by-name mymaster

Defaulted container "redis" out of: redis, sentinel
1) "redis-sentinel-node-0.redis-sentinel-headless.redis-sentinel-demo.svc.cluster.local"
2) "6379"
We can see that redis-sentinel-node-0 has been elected as the new master. However, when we check on the redis-sentinel-node-2, we will see that it still believes that it is the master:
> kubectl exec -it redis-sentinel-node-2 -n redis-sentinel-demo -- redis-cli -p 26379 SENTINEL get-master-addr-by-name mymaster

Defaulted container "redis" out of: redis, sentinel
1) "redis-sentinel-node-2.redis-sentinel-headless.redis-sentinel-demo.svc.cluster.local"
2) "6379"
Now we have two masters! What will happen if we try to write to redis-sentinel-node-0?
> kubectl exec -it redis-sentinel-node-0 -n redis-sentinel-demo -- redis-cli
> SET Hello World
OK
> KEYS *
1) "key:0.44658343468168"
2) "Hello"
3) "key:0.84048536971234"
4) "key:0.35333609737146"
5) "key:0.31869277233197"
6) "key:0.39646477363839"
We can see that the new key has been written to the master node redis-sentinel-node-0.
Since redis-sentinel-node-1 is now replicating from this master, it should also contain the same key:
> kubectl exec -it redis-sentinel-node-1 -n redis-sentinel-demo -- redis-cli
> KEYS *
1) "key:0.44658343468168"
2) "key:0.39646477363839"
3) "key:0.84048536971234"
4) "key:0.35333609737146"
5) "Hello"
6) "key:0.31869277233197"
However, redis-sentinel-node-2 still believes it is the master. It will not replicate from redis-sentinel-node-0 and will not receive the new key written to it.
In fact, we can still write to redis-sentinel-node-2 as well (since it is a master node):
> kubectl exec -it redis-sentinel-node-2 -n redis-sentinel-demo -- redis-cli
> KEYS *
1) "key:0.31869277233197"
2) "key:0.39646477363839"
3) "key:0.35333609737146"
4) "key:0.44658343468168"
5) "key:0.84048536971234"
> SET World Hello
OK
> KEYS *
1) "key:0.31869277233197"
2) "World"
3) "key:0.39646477363839"
4) "key:0.35333609737146"
5) "key:0.44658343468168"
6) "key:0.84048536971234"
We can also confirm that this new key is not present in the node redis-sentinel-node-0 and redis-sentinel-node-1.
Redis Sentinel values availability over consistency of the data.
It allows the data to become inconsistent in case of network failure, but it will eventually converge once the partition is healed.
> kubectl exec -it redis-sentinel-node-2 -n redis-sentinel-demo -- redis-cli -p 26379 SENTINEL get-master-addr-by-name mymaster

Defaulted container "redis" out of: redis, sentinel
1) "redis-sentinel-node-0.redis-sentinel-headless.redis-sentinel-demo.svc.cluster.local"
2) "6379"

> kubectl exec -it redis-sentinel-node-2 -n redis-sentinel-demo -- redis-cli

Defaulted container "redis" out of: redis, sentinel
127.0.0.1:6379> KEYS *
1) "Hello"
2) "key:0.31869277233197"
3) "key:0.39646477363839"
4) "key:0.35333609737146"
5) "key:0.44658343468168"
6) "key:0.84048536971234"
After restoring the network connection, the nodes will eventually converge to a single master.
In this case, redis-sentinel-node-0 is the master, and redis-sentinel-node-2 will be demoted to a replica.
Unfortunately, there will be some data loss in this case as the previous data written to redis-sentinel-node-2 are entirely discarded.
As stated in the docs, Redis and Sentinel are an eventually consistent system where the merge function is last failover wins,
and the data from old masters is discarded to replicate the data of the current master.
Closing
There are many other features and configurations available with Redis Sentinel. The official documentation provides a very detailed overview of Redis Sentinel's concepts as well as the inner workings of Redis Sentinel, such as quorum, epochs, configuration propagation, and others. Moreover, the Bitnami Helm chart also offers a wide range of customizable options to suit various deployment needs.
If you want to learn more about Redis Sentinel, Andy Dunstall provides a great article on the design and implementation of Sentinel. I also can't recommend enough the article by Amila Iddamalgoda which covers the complete guide to this topic.